

This class worked through real-world simulations, where we were able to apply the design process to explore how research impacted the built environment.

The Saffer House Project
This Semester project consisted of many assignments that were all for one home. Our 'Clients' the Saffers are looking for a new design/layout, with accommodation tending to specific personal needs. They requested for a contemporary look that isn't cold and uninviting, as well as a space where they can host many people. There will be a nice open concept in the public spaces, and privacy for the families rooms and such.
The Saffer House Project Consists of an Adjacency Matrix, Bubble Diagrams, Block Diagram, Mood Board, House Model, FF&E Board, and a two minute presentation we prepared as if we were speaking to our client.
Adjacency Matrix

The objective of this matrix was to put all the rooms into perspective. For example to see if a room should be next to (adjacent) to another room. Specifically the symbols represent if a room is Adjacent, would be Convenient, or if there is no relationship. I then continued to color the rooms pink or blue showing whether it was a private or public space.
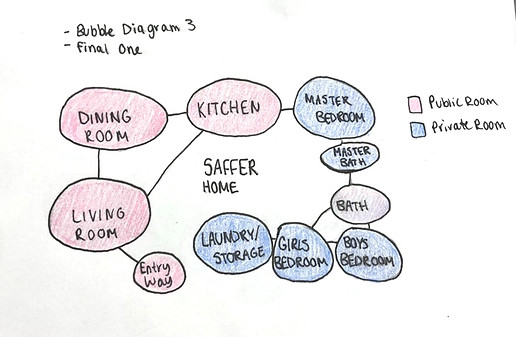
Bubble Diagrams
Through the use of three bubble diagrams, I was able to portray a good idea of what the layout of the Saffer home will be. It is not an exact portrayal, but a vision of where the rooms will go in proportion with one another.

With this diagram I decided to keep the public areas on the left, and the office, bathroom and bedrooms on the right of the entry.

This last bubble diagram I was able to look at the first two, and create a nicer layout. It is the diagram I chose to display for my block diagram in the next image.
Blocking Plan

The Blocking Plan was the final stage in the planning process before I started to draft a floor plan. This step helps to get a good idea of the room spacing within the shape of the house.
Preliminary Floor Plan
The Preliminary Floor Plan is the product of the vision coming to life. Here I hand drafted all the spaces, finding the correct measurements to scale. I worked around the load bearing wall, and made sure to include all the Saffer's wants/needs.
In this plan, I put the laundry room close to the entry, and the Bath closer to the bedrooms. However, in the final Floor Plan below I decided to switch the rooms in order to have a bathroom easily accessible to guests.


This is the final floor plan for the Saffer home, in which I tweaked the plan to make everything flow according to scale/measurement. As I said prior, I switched the bathroom and the laundry room. I also gave the boys bedroom more space as it was small in the preliminary plan.
I was able to take out a double french door and replace it with a large open window next to the dining room for nice natural lighting. Overall I was satisfied with the final layout, and how all the needs were met.

Floor Plan
House Model
From the Floor Plan, I created a model for the Saffers. It just brings a better idea of what the space will look like respective to the other rooms. This assignment only required the plumbing/built in furniture to be shown in the model.


The process of this model was a challenge. It has always been a struggle for me when working with foam core. However, this has been a help at working with precise measurements, while cutting unique openings. If I could change anything about the floor plan from just seeing the model, I would probably change the windows. I would put more windows, and if not that then larger windows.
Mood Board

Apart of the Saffer project, we created a mood board in order to set the tone for all aesthetic and functional decisions. I wanted to display the contemporary style, while also displaying the color scheme I chose to make the environment not feel cold. I wanted to focus on bright lighting, while also narrowing in on small key details. I completed the board by adding a concept statement to describe the design.
The first photo is the design I put together on photoshop. This 24" x 18" picture was mounted onto foam core and matte board. I had the idea to create two designs on photoshop, so I could overlap them. I almost wanted to show the inspiration of the interior mixed with an aesthetic background that would display a beach in which the Saffer's have traveled before.


This is a picture of the two above images combined. It is the actual board I put together and presented for the class. I really love how it turned out, and I like how I was able to see the vision for my design even if no one else did in the beginning.
My only critique for myself would be to clean up the foam core, and to maybe have put the images closer together. In the first picture I was able to hop back on photoshop and fix it (bring the images closer together to avoid large negative spaces).
FF&E Board

This Board consisted of interior decorating elements such as Furniture, Fixtures & Equipment [FF&E]. I selected items to represent what is intended for the space organized in a manner that my clients, the Saffers, can understand. I was able to add key elements such as flooring, fabrics, windows, paint color, artwork, appliances, and more.
House Project Presentation


Our last step for the Saffer Home project was to create a powerpoint showing our mood board, Concept statement, floor plan, house model, and our FF&E board. The objective was to make a presentation not taking pictures of those assignments, but to take certain focuses and elements to highlight. It also had to be a quick two minute presentation to the Saffers.


Lighting Plan
Group Project


Lighting design is an art that can change the entire mood of a space. Using unique fixtures, we decided to find distinct pieces that would be eye-catching. Our goal was to follow a modern Acadamia theme accompanied with a gold and black fixture color scheme.
Design Statement


For this group project we created a Reflected Ceiling plan for a random house we were given. Along with that we had to create a Lighting Fixture Schedule, a Legend, a poster to present and we had to write a Design Statement as seen on the left. We found the light fixtures online, and plugged in necessary information into the schedule. The top left image is our poster in which you can see the exact fixtures we are using.
For this group project I was the team leader, and I really enjoyed it. My group worked really well together. I made sure no one did more work than another, and we all shared our imput on every decision to ensure it wasn't dominated by one opinion. Overall, a great project.